

Rye bread is a light or dark, earthy bread that many people love to bake as an alternative to white and wheat breads, particularly for its health benefits. Because this is a very dense bread (even when baked properly), temperature and bake time are crucial to ensuring that your rye bread doesn’t come out as an inedible brick or a gummy blob.
When making rye bread, bake for 30-35 minutes at 350 °F (176°C). If you are baking rye rolls, the recommended temperature is 375 °F for a bake time of 15-20 minutes. In both instances, your rye product is done when it reaches an internal temperature of 205°F to 210°F.
Now that you know what baking temperatures and times are ideal for rye bread, we will use the rest of this article to discuss how you can determine whether your rye bread is done baking using various methods. Afterward, we will provide our favorite rye bread recipe for you to try.
How to Know When Your Rye Bread Is Done Baking?
The reason we use ideal baking temperatures and times is to give us a general idea of when we can expect our rye bread to be done baking with the best results (ex. decent rise, flaky crust, etc.).
While most rye breads are done baking after half an hour when baked at the magical 350 °F, sometimes you might find yourself opening the oven and still uncertain if you should pull your rye bread loaf out or leave it for a few more minutes.
There are three ways you can determine if your rye bread is done baking after the set bake time has passed.
- Take the rye bread’s internal temperature
- Check the bread visually
- Perform a tap test on the bottom of the rye bread
Here are some tips and tricks on performing each method for you to use in your future rye bread baking endeavors.
Check the Internal Temperature
Of these methods, we always recommend starting with taking the rye bread’s internal temperature with a digital thermometer. This is the easiest, and arguably safest, way to determine if the bread is finished baking or not.
As mentioned previously, the ideal internal temperature for rye bread is 205°F to 210°F. So, if there is ever a moment where you are doubting your bread’s status, it doesn’t hurt to give it a quick internal temperature check.
Check the Bread Visually
If you don’t want to risk poking too many holes into your rye bread while it’s baking to check its internal temperatures, you can potentially tell if it’s done baking just by looking at it. Granted, this is a tactic that will get easier the more your bake, both in general and rye bread specifically.
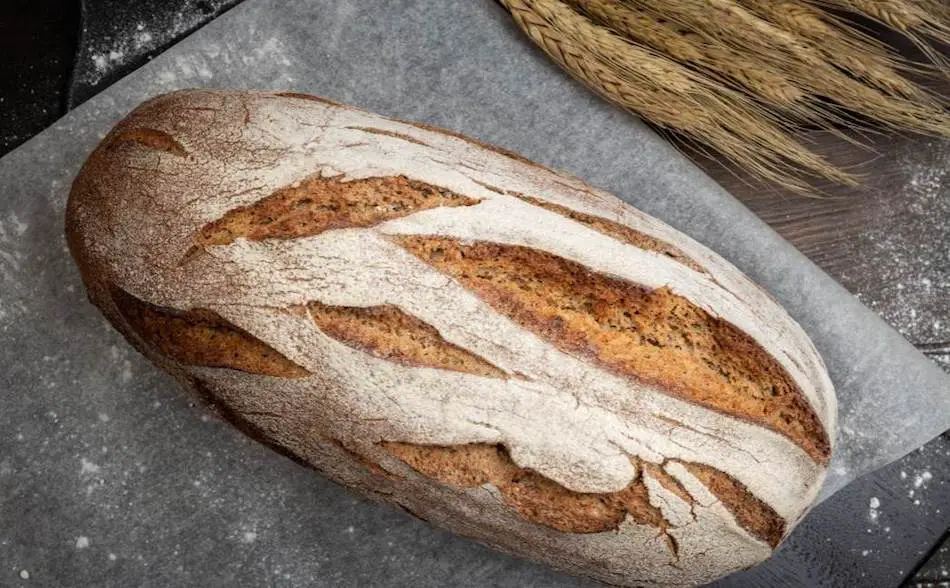
When it is done, rye bread should look light or dark golden brown all over its surface, depending on the type of rye flour you used. If you see any wet spots, that means it needs to bake for a bit longer, and if there are visible signs of burning or charring, then it needs to be removed from the oven.
Unlike many other types of bread, rye bread doesn’t rise too much in the oven, so this isn’t a visual factor you can rely on as much. Scoring it can help if having a taller loaf is important to you, but you’re better off paying attention to your rye bread’s coloring and other aspects than this one.
Perform a Tap Test on the Bottom
Before bakers were blessed with modern tools like the digital thermometer, many would test whether a loaf of bread was officially done baking by tapping the bottom with your thumb.
What you want to hear when doing this, is an almost hollow or echoing sound. This will mean that the bread is cooked through but not overdone. And yes, even though rye bread is known for being dense, it should sound hollow when it has reached its ideal internal temperature and was made properly.
If you tap underneath the bread and find that it sounds dense or wobbly, then it is undercooked in the center and needs more time.
Best Dark Rye Bread Recipe
The only way to gain confidence in your rye-bread-baking abilities is through practice. While the information and tips listed above on ideal baking temperatures, times, and techniques for testing when it is done can help, making mistakes is unavoidable your first few attempts.
However, using a recipe with proper measurements and ingredients can help mitigate the potential for errors and better ensure you are left with a stunning rye bread.
Here, we have listed the ingredients and steps to our top recommended rye bread recipe for you to attempt until your achieve perfection. Once that happens, you can get more creative with toppings, scoring designs, ingredients, and more.
Ingredients
- 1½ tablespoons instant dry yeast
- 2 cups warm water
- 1½ teaspoons salt
- 1½ tablespoons caraway seeds
- 1½ cup rye flour
- 3 cups all-purpose flour
- 2 tablespoons cornmeal for dusting
- ¼ cup of cocoa powder
- 3 tablespoons of dark bootstrap molasses
- Cornstarch Wash:
- 1/4 tsp cornstarch
- 1/4 cup water
Step 1: Combining Dry Ingredients
To start your rye bread dough, you’ll need to combine the following ingredients in an electric mixer.
- Instant dry yeast
- Salt
- 2 cups of warm water
- Caraway
- Rye flour
- Cocoa powder
- Molasses
- 2 ½ cups of all-purpose flour (to start)
Step 2: Start Kneading
Once all the dough ingredients are in your electric mixer, set it to medium speed and allow it to knead the dough until you notice that it starts to pull away from the sides of the bowl.
Feel free to add the remaining ½ cup of flour to the mixture, if necessary, until our dough has the ideal consistency. It should feel tacky but not sticky to the point that it clings to your fingers.
Step 3: Transfer and Let it Rise
Now that your dough is ready, lightly grease a large bowl and then transfer your ball of dough to the bowl. Roll the dough ball around the bowl’s interior to grease it. This is important for ensuring the dough does not dry out while it rises.
After the rye dough is greased up, lay a towel over the bowl, and leave the dough to rise until it doubles in size (this process will typically take about an hour).
Step 4: Shape the Loaf
On a flat, smooth, clean surface, sprinkle a light layer of cornmeal. You’ll then grab your rye dough ball and begin shaping it your preferred loaf shape.
The technique for this is to hold the dough in both hands with your thumbs on top. Using these thumbs pull dough from the top of the ball towards the bottom as you slowly rotate the ball in your hands. After just a few minutes of this, you should be able to create a loaf shape.
Set your rye dough loaf on top of the cornmeal dusted surface and allow it to rest again for 40 minutes.
Step 5: Prepare Your Oven
While your rye loaf is resting, preheat your oven to 350 degrees Fahrenheit and set a baking stone on the top rack. If you don’t have a baking stone, you could use a Dutch oven or baking pan/bread, or a number of alternatives.
On the rack directly underneath, you’ll want to slide a pan that can safely hold water (do not use a glass pan).
Step 6: Brush and Score the Loaf
Combine the listed ingredients to create your cornstarch wash and then heat this mixture in the microwave for about 40 seconds until the cornstarch has dissolved and the liquid is clear.
Brush your cornstarch liquid on top of your rye loaf using a pastry brush and then score the top with a sharp knife in your preferred pattern.
Step 7: Bake Until Done
Place your rye bread loaf onto your baking stone on the top shelf and then add water to your pan on the second shelf until it is half full. This will create a steam oven that will help ensure your rye bread does not dry out.
Bake for 30 minutes and then transfer your rye bread to a wire rack. Allow the loaf to cool completely before slicing it.
Final Thoughts
Baking rye bread, even at the proper temperatures and for the recommended length of time, can be a challenge at first. Luckily, with the right recipe, ingredients, techniques, and no small amount of practice, you’ll be able to make one stunning loaf or batch of rye buns after another.