

Rye bread has long been a staple in many cuisines around the world. Its nutty, earthy flavor and dense, chewy texture make it the perfect accompaniment to soups, stews, and sandwiches. However, not all rye bread is created equal. The secret to the perfect loaf lies in the baking technique, and for that, nothing compares to the Dutch oven. In this article, we will explore the art of baking rye bread in a Dutch oven. From preparing the dough to shaping and scoring, we will cover everything you need to know to achieve the perfect loaf. Whether you’re a seasoned baker or a novice, this guide will help you master the technique and create a rye bread that is sure to impress. So, let’s get started on the journey to creating the perfect rye bread in a Dutch oven.
Rye bread is a type of bread made with rye flour, which is known for its distinctive, nutty, and earthy flavor. Rye bread is often denser and heavier than other types of bread and is also considered more nutritious. Dutch ovens are a type of heavy, lidded pot made of cast iron, clay or ceramics, which are well-suited for bread-making. The heavy lid and walls of a Dutch oven create a moist environment that allows the bread to rise and develop a crispy crust. Therefore, baking rye bread in a Dutch oven is a technique that allows to achieve a perfect loaf of bread by creating a balance between a flavorful and satisfying bread, due to the perfect environment for the bread to rise and develop a crispy crust.
Rye Bread in a Dutch Oven: Step-by-Step
| Step | Description |
|---|---|
| 1 | Preheat the Dutch oven and the oven to the desired temperature |
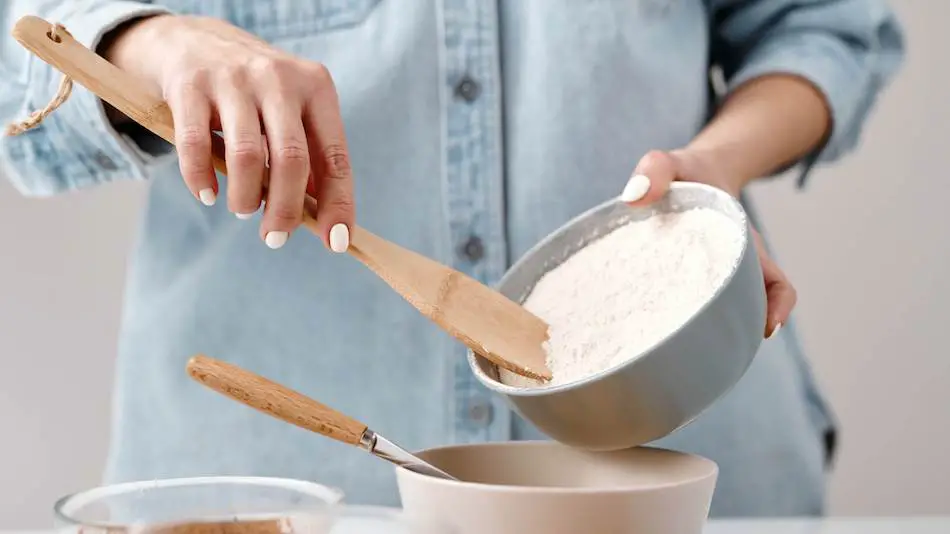
| 2 | Mix flour, salt, yeast, and any other desired ingredients in a mixing bowl |
| 3 | Gradually add water and mix until the dough is formed |
| 4 | Knead the dough for a few minutes to develop the gluten |
| 5 | Allow the dough to rise in a warm place until doubled in size |
| 6 | Shape the dough into a round loaf and place it in the Dutch oven |
| 7 | Make a shallow cut on the top of the dough to allow for expansion |
| 8 | Cover the Dutch oven and place it in the preheated oven |
| 9 | Bake for the desired time, usually around 45 minutes |
Quick Tips
- For a crispy crust, add a small amount of water at the bottom of the Dutch oven before placing the dough inside.
- To achieve ideal texture, maintain and care for the Dutch oven properly
- Use different types of flours and grains to make rye bread in a Dutch oven
- Adjust the recipe for high altitude baking
- Using a Dutch oven for steaming the bread dough for rye bread
- Experiment with different variations on the traditional recipe for rye bread
- Troubleshoot common issues when baking rye bread in a Dutch oven
- You can add different types of seeds, nuts, and dried fruits to the dough for additional flavor and texture.
Preparing the Dough for Rye Bread in a Dutch Oven
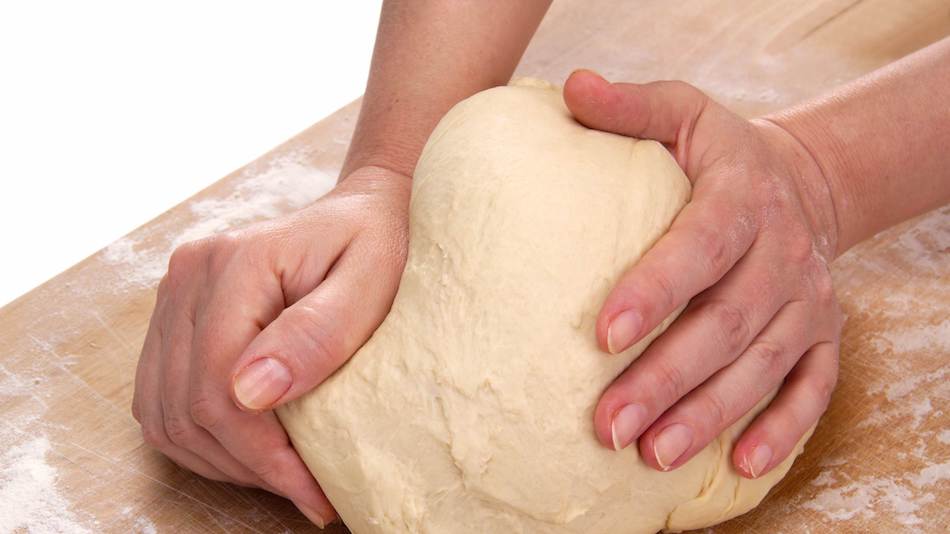
The most important step in the baking process is preparing the dough. And when it comes to rye bread, it’s essential to have the right balance of ingredients to achieve that perfect texture and flavor. And that’s where the Dutch oven comes in.
The Dutch oven creates the perfect environment for the dough to rise, and its heavy lid locks in the heat and moisture, resulting in a crispy crust and a soft, moist interior. But before we can even think about putting that dough in the oven, we need to make sure it’s prepared properly.
To make the dough for rye bread in a Dutch oven, you’ll need a combination of rye flour, bread flour, yeast, salt, and water. The key is to mix the ingredients until they come together to form a cohesive dough. It’s important to take your time and make sure the dough is well-kneaded, as this will help to develop the gluten and give the bread its structure. Once the dough is ready, it needs to be left to rise before shaping and scoring. It’s a process that requires patience, but trust me, the end result is worth it.
Using a Dutch Oven to Create a Perfect Crust on Rye Bread
There’s nothing quite like a perfectly crispy crust on a loaf of bread. And when it comes to rye bread, the Dutch oven is the key to achieving that coveted crust.
A Dutch oven’s heavy lid and walls trap in heat and moisture, creating the perfect environment for the bread to rise and develop a crust. The lid also allows for steaming, which helps to create a crust that’s not only crispy, but also full of flavor.
When baking rye bread in a Dutch oven, the key is to preheat the oven and the pot. This ensures that the bread is exposed to high heat from the start, which helps to create a crust that’s golden brown and crispy. Once the bread is in the oven, the lid can be removed to allow the bread to continue to bake and develop a crust. It’s a technique that takes some practice, but once you’ve mastered it, you’ll be able to create a rye bread with a crust that’s truly worthy of a bread connoisseur’s approval.
Different Flours and Grains When Making Rye Bread
| Flour/Grain | Characteristics |
|---|---|
| Wheat flour | Commonly used in bread making, provides structure to the dough |
| Rye flour | Gives the bread a distinct flavor, can be used in combination with wheat flour |
| Barley flour | Adds a nutty flavor, can be used to replace some of the wheat flour |
| Spelt flour | Nutty and sweet flavor, can be used as a wheat flour substitute |
| Buckwheat flour | Nutty flavor, Gluten-free, can be used to replace some of the wheat flour |
The Benefits of Using a Dutch Oven for Baking Rye Bread
There are few tools as versatile and effective as a Dutch oven. And when it comes to rye bread, the benefits of using a Dutch oven are even more pronounced.
First and foremost, a Dutch oven creates the perfect environment for the bread to rise and develop a crust. The heavy lid and walls trap in heat and moisture, allowing the bread to rise and develop a crust that’s both crispy and flavorful. The lid also allows for steaming, which helps to create a crust that’s not only crispy, but also full of flavor.
Another benefit of using a Dutch oven for baking rye bread is that it’s incredibly versatile. It can be used for a variety of cooking methods, including baking, braising, and roasting. This means that you can use the same pot to make a variety of different dishes, which is great if you’re short on kitchen space or equipment.
Dutch ovens are incredibly durable, so they’ll last you a long time. They are made of cast iron, clay or ceramics and they can withstand high temperatures and be used in both the oven and on the stovetop. This makes them a great investment for any home cook or professional baker.
Tips for Achieving the Ideal Texture in Rye Bread Baked in a Dutch Oven
Texture is everything when baking bread. You want a loaf that’s moist and airy on the inside, with a crispy crust that crackles with each bite.
Firstly, it’s important to use the right flour. Rye flour is denser and heavier than other types of flour, so it’s essential to use a combination of rye flour and bread flour to achieve the right balance. Yeast, salt, and water are also important ingredients that will affect the texture of the bread.
Next, pay attention to the rise. The dough needs to be left to rise for the right amount of time, so that the bread has enough structure and air pockets. But be careful not to over-rise, as this can cause the bread to collapse.
When it comes to shaping and scoring the dough, it’s important to be gentle. You want to create a nice shape and score the bread without deflating it. This will help to promote a good rise and a crispy crust.
And finally, the key to achieving the perfect texture in rye bread baked in a Dutch oven is to pay attention to the oven temperature and humidity. The Dutch oven should be preheated and the bread should be placed in the oven as soon as possible to take advantage of the high heat. And once the bread is in the oven, the lid should be removed to allow the bread to continue to bake and develop a crust.
How to Maintain and Care for your Dutch Oven when Baking Rye Bread
When baking bread, having the right tools is half the battle. And when it comes to rye bread, the Dutch oven is a crucial piece of equipment. But like any piece of kitchen equipment, it’s important to take care of it so that it lasts for years to come.
First and foremost, it’s important to keep your Dutch oven clean. This means washing it after each use and drying it thoroughly. Be sure to avoid using soap, as this can strip the seasoning from the pot. Instead, use hot water and a stiff brush to remove any food particles.
It’s also important to keep the Dutch oven seasoned. The seasoning is a protective layer that helps to prevent rust and makes the pot non-stick. To do this, you can use vegetable oil or flaxseed oil to coat the inside of the pot and then heat it in the oven at 350°F for an hour.
Finally, be sure to store your Dutch oven properly. This means keeping it in a dry place, preferably in a cabinet or on a shelf. Avoid storing it outside or in damp areas, as this can cause rust.
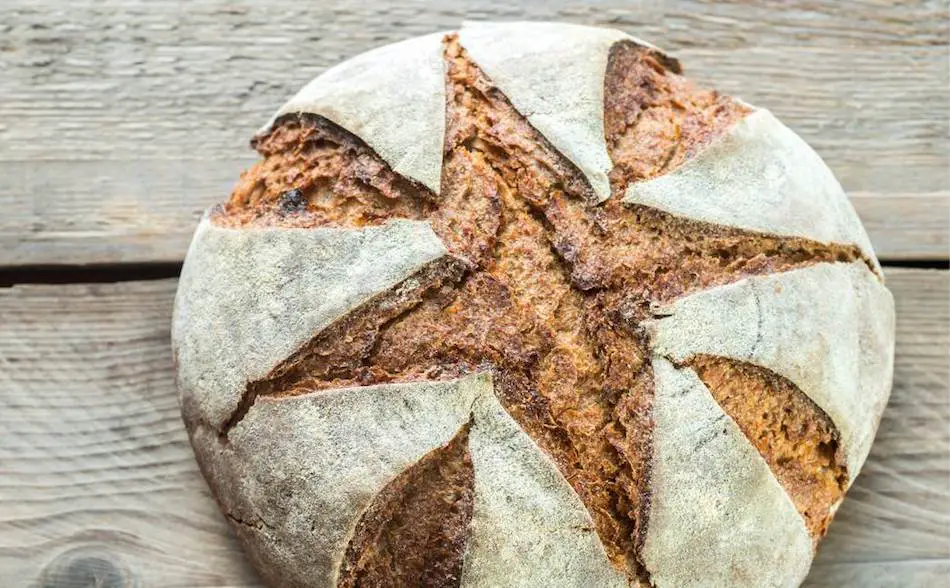
Techniques for Shaping and Scoring the Dough Before Baking in a Dutch Oven
Shaping and scoring the dough is an essential step when baking bread. It’s what gives the bread its final shape and helps to promote a good rise and a crispy crust.
One thing that is very important is to let the dough rise for the right amount of time. This will allow it to develop structure and air pockets, which will make it easier to shape.
When shaping the dough, be gentle. You want to create a nice shape without deflating it. This can be done by using a bench scraper or your hands to shape the dough into a round or oval shape.
Once the dough is shaped, it’s time to score it. Scoring is the process of making a shallow cut on the top of the dough. This allows the bread to expand while baking and also allows the baker to create a design. A common design for rye bread is a “X” shape or a “V” shape, this can be done using a sharp knife or a lame.
It’s important to remember that shaping and scoring the dough is a delicate process that takes practice. But once you’ve mastered it, you’ll be able to create a rye bread that’s not only delicious, but also visually appealing.
And finally, the key to achieving the perfect shape and scoring the dough is to do it quickly and gently, to not deflate the dough, and to use a sharp blade or tool, for precise and clean cuts.
Variations on the Traditional Recipe for Rye Bread Baked in a Dutch Oven
There’s nothing quite like a classic recipe when baking a loaf of bread. But let’s be real, sometimes you need to shake things up.
One variation on the traditional recipe is to add different seeds and nuts to the dough. This can add a whole new dimension of flavor and texture to the bread. Try adding caraway seeds, fennel seeds, or chopped walnuts to the dough.
Another variation is to play around with different types of flours. While rye flour is the traditional choice, you can experiment with other types of flours, like barley flour, spelt flour, or even whole wheat flour. This will give the bread a different flavor and texture.
You can also play around with different types of sweeteners. While traditional rye bread is made with sugar, you can experiment with different types of sweeteners, like honey, maple syrup, or molasses. This will give the bread a different flavor and sweetness.
You can also try adding different types of dried fruits to the dough. This can add a whole new dimension of flavor and texture to the bread. Try adding raisins, cranberries, or apricots to the dough.
The possibilities are endless when it comes to variations on the traditional recipe for rye bread baked in a Dutch oven. And that’s the beauty of baking bread. It’s a craft that allows you to be creative and play with flavors and ingredients to find your own perfect loaf of bread. So, don’t be afraid to experiment and have fun with it.
Comparison of Different Types of Sweeteners Used in Making Rye Bread
| Sweetener | Characteristics |
|---|---|
| Sugar | Provides sweetness, helps browning and helps retain moisture |
| Honey | Provides sweetness and adds a unique flavor to the bread |
| Molasses | Provides sweetness and adds a rich, complex flavor to the bread |
| Maple syrup | Provides sweetness and a distinct maple flavor, can be used as a natural sweetener |
| Agave nectar | Provides sweetness and a mild flavor, can be used as a natural sweetener |
How to Achieve the Perfect Temperature and Humidity for Baking Rye Bread in a Dutch Oven
When it comes to baking bread, temperature and humidity are key.
Always preheat the Dutch oven before baking the bread. This will ensure that the bread is exposed to high heat from the start, which helps to create a crust that’s golden brown and crispy.
The temperature of the oven should be around 425°F to 450°F. This will ensure that the bread gets a good rise and develops a crispy crust.
Humidity is also important when baking bread. The Dutch oven creates a humid environment that allows the bread to rise and develop a crust. The lid of the Dutch oven should be placed on top of the pot for the first 15-20 minutes of baking to create the perfect humidity. Once the bread has risen and the crust has formed, the lid should be removed to allow the bread to continue to bake and develop a crust.
It’s also important to monitor the bread as it bakes. You’ll want to keep an eye on the color of the crust and the internal temperature of the bread. A thermometer can help you to achieve the perfect temperature.
Troubleshooting Common Issues When Baking Rye Bread in a Dutch Oven
Things don’t always go according to plan when baking, and when it comes to rye bread, the Dutch oven can present its own set of challenges. But with a little know-how, you can troubleshoot common issues and get back on track to baking the perfect loaf.
One common issue is a dense loaf. This can be caused by not using enough yeast or over-kneading the dough. To fix this, make sure you’re using the right amount of yeast and be gentle when kneading the dough.
Another issue is a soggy crust. This can be caused by too much humidity in the oven. To fix this, make sure to preheat the Dutch oven before baking and remove the lid after the first 15-20 minutes of baking.
A third common issue is a loaf that doesn’t rise. This can be caused by old yeast or not enough warmth for the dough to rise. To fix this, make sure to use fresh yeast and provide a warm environment for the dough to rise.
Finally, a common issue is a loaf with an uneven shape. This can be caused by uneven shaping and scoring of the dough. To fix this, make sure to shape the dough gently and score it evenly.
Using Different Types of Flours and Grains to Make Rye Bread in a Dutch Oven
Experimenting with different flours and grains can add a whole new dimension of flavor and texture.
One way to change up the traditional recipe is to use a combination of rye flour and other types of flour. For example, using a mixture of rye flour and whole wheat flour can add a nutty flavor and a coarser texture to the bread.
Another option is to use a combination of rye flour and other types of grains. Barley flour, spelt flour, or oat flour can add a different flavor and texture to the bread.
You can also experiment with using different types of grains in the bread. Adding seeds, such as caraway seeds, fennel seeds, or sesame seeds, can add a whole new dimension of flavor to the bread.
Finally, you can also use different types of sweeteners and dried fruits to add a different flavor and sweetness to the bread.
When using different types of flours and grains to make rye bread in a Dutch oven, it’s important to keep in mind that the dough may behave differently and may require different rising times and oven temperatures. But with a little experimentation, you can create a bread that’s truly unique and delicious. And that’s the beauty of baking bread, it’s a craft that allows you to be creative and play with flavors and ingredients to find your own perfect loaf of bread. So, don’t be afraid to experiment and have fun with it.
Adjusting the Recipe for Rye Bread in a Dutch oven for High Altitude Baking
Altitude can play a big role in the outcome of your loaf. And when it comes to rye bread, the Dutch oven is the perfect tool to achieve the perfect loaf, no matter the altitude.
At high altitude, the air pressure is lower, which means that leavening agents like yeast work faster, and liquids evaporate more quickly. This can affect the rise of the dough and the bake of the bread.
To adjust the recipe for high altitude baking, you’ll need to make a few adjustments. First, you may need to increase the amount of yeast used in the recipe. This will help to compensate for the faster rise time at high altitude.
You may also need to reduce the amount of liquid used in the recipe. This will help to prevent the bread from becoming too wet, which can lead to a dense loaf.
Finally, you may need to increase the baking time and/or temperature. This will help to ensure that the bread is fully baked and has a crispy crust.
It’s important to keep in mind that these adjustments are just a starting point, and you may need to make further adjustments based on your specific altitude and oven. But with a little experimentation, you’ll be able to create a rye bread that’s truly delicious, no matter the altitude.
Using a Dutch Oven for Steaming the Bread Dough for Rye Bread
Steam is key to achieving a crispy crust and a moist interior. And when it comes to rye bread, the Dutch oven is the perfect tool to create the perfect steam environment.
A Dutch oven has a tight-fitting lid, which traps steam inside the pot, creating a humid environment that allows the bread to rise and develop a crust. To create steam in a Dutch oven, you can preheat the oven and the pot. Then, place the dough inside the pot and put the lid on. The heat from the oven and the pot will create steam inside the pot, which will help the bread to rise and create a crispy crust.
You can also add a small amount of water to the bottom of the pot before placing the dough inside. As the bread bakes, the water will evaporate and create steam inside the pot.
It’s important to note that the lid should be removed after the first 15-20 minutes of baking to allow the bread to continue to bake and develop a crust. Once the crust is formed, the bread should be finished baking with the lid off.
Using a Dutch oven for steaming the bread dough for rye bread is a technique that can take some practice, but once you’ve mastered it, you’ll be able to create a rye bread with a crispy crust and a moist interior that’s truly worthy of a bread connoisseur’s approval.
How to Make a Gluten-Free Version of Rye Bread in a Dutch Oven
When baking a gluten-free loaf, it can be challenging to recreate the texture and flavor of traditional breads. But with the right ingredients and techniques, it is possible to make a delicious gluten-free version of rye bread in a Dutch oven.
The key to making a gluten-free version of rye bread is to use gluten-free flours and other ingredients that mimic the texture and flavor of traditional rye bread. A combination of gluten-free flour such as almond flour, coconut flour, and sorghum flour can be used to make a loaf. Starches such as arrowroot, potato, or tapioca flour can also be used to help bind the ingredients together and give the bread structure.
You can also use ingredients such as caraway seeds, molasses or honey to add the traditional flavor of rye bread.
It’s also important to note that gluten-free doughs behave differently than traditional wheat doughs, and may require different rising times and oven temperatures. It’s important to adjust the recipe accordingly and be prepared to make some adjustments as you bake.
When making a gluten-free version of rye bread in a Dutch oven, it’s important to be patient, and don’t be afraid to experiment with different ingredients and techniques until you find the perfect combination that works for you. With a little experimentation, you’ll be able to create a gluten-free bread that’s not only delicious, but also visually appealing.
| Recipe | Ingredients | Instructions |
|---|---|---|
| Gluten-Free Rye Bread | – 1 1/2 cups gluten-free flour mix (almond flour, coconut flour, sorghum flour) – 1/2 cup starch (arrowroot, potato, or tapioca flour) – 1 tbsp caraway seeds – 2 tsp yeast – 1 tsp salt – 2 tbsp honey or molasses | 1. In a mixing bowl, combine the gluten-free flour mix, starch, caraway seeds, yeast, and salt. 2. Gradually add water and mix until a dough forms. 3. Knead the dough for a few minutes to develop the gluten. 4. Allow the dough to rise in a warm place for 6-8 hours. 5. Shape the dough into a round loaf and place it in the Dutch oven. 6. Make a shallow cut on the top of the dough to allow for expansion. 7. Cover the Dutch oven and place it in the preheated oven. 8. Bake for 45 minutes or until the crust is golden brown. |
How to Make Rye Bread with a Crispy Crust Using a Dutch Oven
When it comes to baking bread, a crispy crust is the holy grail. And when it comes to rye bread, the Dutch oven is the perfect tool to achieve that perfect crust.
First and foremost, it’s important to start with a good dough. This means using the right ratio of flour, water, yeast, and salt. And also, fermenting the dough for the right amount of time.
Once the dough is ready, it’s important to create steam inside the Dutch oven. This can be done by preheating the oven and the pot, and then placing a small amount of water at the bottom of the pot before placing the dough inside. As the bread bakes, the water will evaporate and create steam inside the pot, which will help the bread to rise and create a crispy crust.
Another key to a crispy crust is to score the dough before baking. Scoring the dough is the process of making a shallow cut on the top of the dough. This allows the bread to expand while baking, and also allows the baker to create a design. A common design for rye bread is a “X” shape or a “V” shape, this can be done using a sharp knife or a lame.
Finally, it’s important to monitor the bread as it bakes. You’ll want to keep an eye on the color of the crust, and the internal temperature of the bread. A thermometer can help you to achieve the perfect temperature.
How to Make a Rye Bread with a Soft and Moist Interior Using a Dutch Oven
The ultimate goal when baking bread is achieving a soft and moist interior. And when it comes to rye bread, the Dutch oven is the perfect tool to achieve that perfect texture.
Always remember to use the right ratio of flour, water, yeast, and salt in the dough. A higher hydration level in the dough will result in a softer and moister bread. Also, allowing the dough to rise for a longer period of time will help to develop the gluten structure and create a softer bread.
Another key to a soft and moist interior is to create steam inside the Dutch oven. This can be done by preheating the oven and the pot and then placing a small amount of water at the bottom of the pot before placing the dough inside. As the bread bakes, the water will evaporate and create steam inside the pot, which will help the bread to rise and create a soft and moist interior.
It’s also important to monitor the bread as it bakes. You’ll want to keep an eye on the internal temperature of the bread, and take it out of the oven when it reaches an internal temperature of around 200F.
Also, it’s important to let the bread cool down before slicing into it. This will help to set the crumb structure, and keep the bread soft and moist.
Creating a rye bread with a soft and moist interior using a Dutch oven can be a bit tricky, but with a little practice and attention, you’ll be able to create a bread that’s not only delicious, but also visually appealing with a soft and moist interior that will make your taste buds sing.
How to make a rye bread with a perfect balance of sourness and sweetness using a Dutch oven
When baking bread, achieving the perfect balance of sourness and sweetness is a delicate balance.
One key to achieving the perfect balance of sourness and sweetness is to use the right type of starter. A sourdough starter can add a slight tanginess to the bread and a depth of flavor. You can make your own starter or purchase a pre-made one.
Another key is to use the right type of sweetener. Traditional rye bread is made with sugar, but you can experiment with different types of sweeteners, such as honey, molasses or maple syrup to add a different flavor and sweetness to the bread.
You can also play around with the fermentation time, a longer fermentation time will result in a more sour bread, a shorter fermentation time will result in a sweeter bread.
Finally, it’s important to monitor the bread as it bakes. You’ll want to keep an eye on the color of the crust, and the internal temperature of the bread. A thermometer can help you to achieve the perfect temperature.
Achieving the perfect balance of sourness and sweetness when making a rye bread using a Dutch oven can be a delicate balance, but with a little practice and attention, you’ll be able to create a bread that’s not only delicious, but also visually appealing with a balance of sourness and sweetness that will make your taste buds dance.
How to Make a Rye Bread with a Variety of Seeds and Nuts Using a Dutch Oven
Adding a variety of seeds and nuts can make all the difference to a loaf of freshly baked bread.
The first step is to choose the right type of seeds and nuts. Popular choices for rye bread include caraway seeds, fennel seeds, sesame seeds, sunflower seeds, pumpkin seeds, and flax seeds. You can also add chopped nuts such as walnuts, hazelnuts, or almonds to the dough.
When adding seeds and nuts to your dough, it’s important to remember that they can absorb moisture, so you may need to adjust the amount of liquid used in the recipe. It’s also important to mix them evenly throughout the dough to ensure an even distribution.
When shaping the dough, you can also add a topping of seeds and nuts on the surface of the dough before baking to give it a nice crust and add a different texture.
How to Make a Rye Bread with a Variety of Spices Using a Dutch Oven
Mixing in a variety of spices can take your bread to the next level. And when it comes to rye bread, the Dutch oven is the perfect tool to achieve that perfect loaf.
The first step is to choose the right type of spices. Popular choices for rye bread include caraway seeds, fennel seeds, anise seeds, coriander seeds, cumin, and even a touch of black pepper. You can also add dried herbs such as thyme, rosemary or oregano to the dough.
When adding spices to your dough, it’s important to remember that they can absorb moisture, so you may need to adjust the amount of liquid used in the recipe. It’s also important to mix them evenly throughout the dough to ensure an even distribution.
When shaping the dough, you can also add a topping of spices on the surface of the dough before baking to give it a nice crust and add a different texture.
When using a Dutch oven, the lid should be removed after the first 15-20 minutes of baking to allow the bread to continue to bake and develop a crust. Once the crust is formed, the bread should be finished baking with the lid off.
How to Make a Rye Bread with a Variety of Dried Fruits Using a Dutch Oven
If you want to add some extra zing to your bread, throwing in some dried fruits can be just the thing.
The first step is to choose the right type of dried fruits. Popular choices for rye bread include raisins, currants, cranberries, apricots, and figs. You can also add chopped nuts such as walnuts, hazelnuts, or almonds to the dough for a more complex flavor.
When adding dried fruits to your dough, it’s important to remember that they can absorb moisture, so you may need to adjust the amount of liquid used in the recipe. It’s also important to mix them evenly throughout the dough to ensure an even distribution.
When shaping the dough, you can also add a topping of dried fruits on the surface of the dough before baking to give it a nice crust and add a different texture.