

Sourdough bread has become increasingly popular in recent years, and for good reason. It is a delicious and healthy alternative to commercially made bread, and the process of making it can be both rewarding and therapeutic. However, the process of making sourdough bread can also be intimidating for beginners, with many questions and misconceptions surrounding it. That’s why we’ve put together this comprehensive guide to answer the 31 most frequently asked questions about making sourdough bread. Whether you’re a complete beginner or just looking to brush up on your skills, this guide will provide you with all the information you need to make delicious and healthy sourdough bread at home. From creating a starter to shaping and baking the dough, we’ll cover it all. So, let’s get started and learn how to make sourdough bread like a pro!
What is sourdough bread?
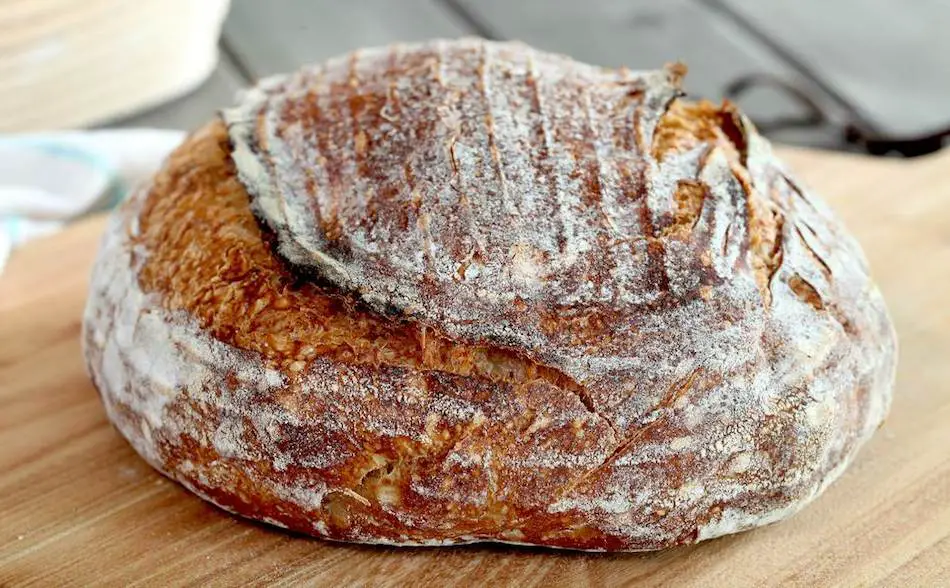
Sourdough bread is a type of bread that is made using a natural leavening agent called a sourdough starter. Unlike traditional bread which uses commercial yeast, sourdough bread relies on wild yeast and lactic acid bacteria present in the environment to ferment the dough and make it rise. This fermentation process imparts a unique flavor and texture to the bread, and also improves its nutritional value. Sourdough bread is considered a traditional and ancient method of bread making, and is still popular today due to its unique taste and health benefits.
What is a sourdough starter?
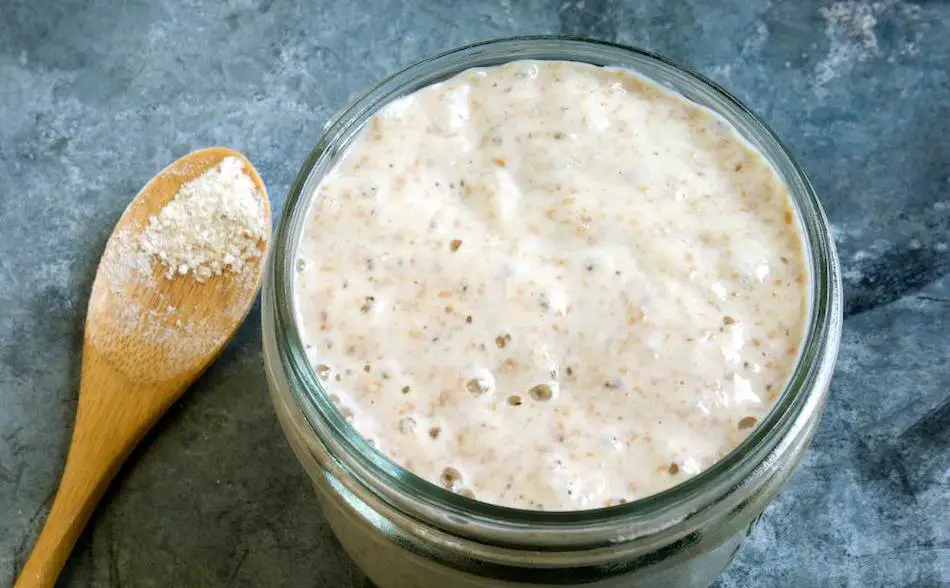
A sourdough starter is a mixture of flour and water that is used as a natural leavening agent in the making of sourdough bread. It is a living culture of wild yeast and lactic acid bacteria that are naturally present in the environment. The mixture is allowed to ferment over time, during which the wild yeast and bacteria begin to multiply and produce carbon dioxide, which causes the dough to rise. The starter is used to inoculate the dough, providing the yeast and bacteria necessary to ferment the dough and create the characteristic tangy flavor and texture of sourdough bread. Starters can also be maintained for long time, passed down and shared among bakers.
How do I make a sourdough starter?
Making a sourdough starter is a simple process that involves mixing flour and water together and allowing it to ferment. The exact method may vary depending on the recipe, but generally, the following steps can be used as a guide:
- Mix together equal parts flour and water in a clean and non-reactive container (such as a glass jar). Use flour that is unbleached and un-bromated, such as whole wheat flour, rye flour, or all-purpose flour.
- Cover the container with a lid or cloth and let it sit at room temperature for 24 hours.
- After 24 hours, discard half of the mixture and add an equal amount of flour and water to the remaining mixture. Stir well to combine.
- Cover the container and let it sit at room temperature for another 24 hours.
- Repeat step 3 and 4 for several days, discarding half of the mixture and adding equal parts flour and water each time, until the starter becomes active and bubbly. This can take anywhere from 3 to 7 days, depending on the temperature and humidity of your environment.
- Once the starter is active, it can be used to make sourdough bread or it can be stored in the refrigerator for future use.
It is important to note that the process of making a sourdough starter is not an exact science and the timing may vary. It is important to check the starter regularly and pay attention to its appearance, smell and texture to know when it is ready.
Sourdough Starter Maintenance Schedule
| Step | Description |
|---|---|
| Feeding | This step involves adding fresh flour and water to the sourdough starter to keep it active. It is usually done once or twice a day, depending on the temperature and humidity of the environment. |
| Discarding | This step involves removing some of the sourdough starter before feeding it. This is done to prevent the starter from becoming too crowded with wild yeast and bacteria. |
| Storage | This step involves keeping the sourdough starter in a cool and dry place. It can be stored in the refrigerator or at room temperature, depending on the desired level of activity. |
Can I use store-bought yeast for sourdough bread?
No, sourdough bread is made using a sourdough starter, which is a natural leavening agent that contains wild yeast and lactic acid bacteria. Store-bought yeast, also known as commercial yeast, is a different type of yeast that is not typically used to make sourdough bread. While it is possible to make bread using a combination of sourdough starter and commercial yeast, it will not be considered true sourdough bread as the flavor and texture will be different. If you want to make traditional sourdough bread, it is best to use only a sourdough starter.
What are the benefits of sourdough bread?
Sourdough bread has several potential benefits compared to bread made with commercial yeast. Some of the benefits include:
- Improved digestion: The fermentation process used to make sourdough bread breaks down the gluten and other complex carbohydrates in the flour, making it easier to digest.
- Increased nutrient availability: The fermentation process also increases the availability of vitamins and minerals in the bread, such as B vitamins and iron.
- Lower glycemic index: Sourdough bread has a lower glycemic index compared to bread made with commercial yeast, which means that it is absorbed more slowly into the bloodstream and can help to regulate blood sugar levels.
- Longer shelf life: Sourdough bread has a longer shelf life than bread made with commercial yeast, thanks to the acidity created by the lactic acid bacteria during fermentation.
- Unique flavor: Sourdough bread has a unique tangy flavor that is created by the lactic acid produced during fermentation, which sets it apart from other types of bread.
- Traditional and ancient way of making bread: Sourdough bread is considered to be a traditional and ancient way of making bread, which is still popular today due to its unique taste and health benefits.
It is important to note that the benefits of sourdough bread may vary depending on the recipe and method used. Also, it is best to consume it in moderate amount as excessive intake may cause stomach upset, bloating, and flatulence.
How long does it take to make sourdough bread?
The time it takes to make sourdough bread varies depending on a number of factors, including the temperature and humidity of your kitchen, the strength of your starter, and the recipe you are using. In general, the process can take anywhere from a few days to a week.
Creating a sourdough starter, which is a mixture of flour and water that is fermented to create the natural yeast needed for sourdough bread, can take anywhere from 5 to 7 days. Once the starter is active, it can be used to make bread.
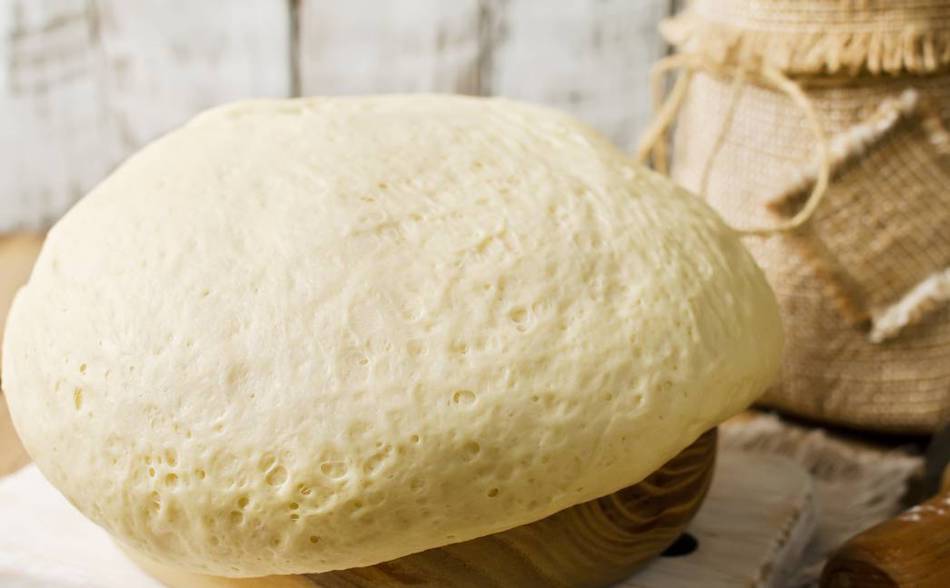
The actual bread making process begins with mixing the flour, water, and starter together to form the dough. This is typically left to rest and rise for several hours, and can take anywhere from 4 to 24 hours depending on the recipe and the temperature of your kitchen.
After the dough has risen, it is then shaped and placed in a Dutch oven or a banneton, which is typically left to rise again for another hour or two. The bread is then baked in the oven for about 30-60 minutes, depending on the size of the loaf.
What are the best flour types for sourdough bread?
There are several types of flour that can be used to make sourdough bread, but the most commonly used flours are:
- Whole wheat flour: This flour is made from the entire wheat kernel, including the bran, germ, and endosperm. It provides a nutty flavor, a dense texture, and a high nutritional value.
- Rye flour: This flour is made from ground rye grains and it has a distinct flavor and a lower gluten content compared to wheat flour, which can make the bread denser.
- All-purpose flour: This flour is a blend of hard and soft wheat and it is the most commonly used flour for sourdough bread. It can be used alone or in combination with other flours to make a lighter bread.
- Bread flour: This flour is made from hard wheat and has a higher protein content than all-purpose flour. It creates a stronger gluten structure, which can result in a lighter, airier bread.
- Whole grain flour: Whole grain flour is made from whole wheat berries and it’s high in fiber, vitamins, minerals and other nutrients. Using whole grain flour can give a richer and more complex flavor, but it can make the bread denser and heavier.
| Type of Flour | Description | Effect on Final Product |
|---|---|---|
| All-purpose | A blend of hard and soft wheat, usually enriched with vitamins and minerals. | Produces a light and airy loaf with a mild flavor. |
| Whole wheat | Made from the entire wheat kernel, including the bran, germ, and endosperm. | Produces a denser loaf with a nuttier flavor and a chewier texture. |
| Gluten-free | Made from a combination of gluten-free flours such as rice, corn, and quinoa. | Produces a loaf with a different texture and flavor than traditional sourdough bread. It may not rise as much as traditional sourdough bread. |
Can I make sourdough bread in a bread machine?
It is possible to make sourdough bread in a bread machine, but it may require some adjustments to the usual bread machine recipe. The process of making sourdough bread involves a fermentation period, during which the dough rises and develops flavor. Some bread machines have a Sourdough setting that allows for a longer fermentation period, which can be used to make sourdough bread.
However, it may be difficult to get the desired texture and flavor of the bread, because bread machines are designed to make bread with commercial yeast which ferments faster and requires less time than sourdough starter. The dough may also not rise as much in a bread machine as it would if made by hand.
It is best to consult the manual of the specific bread machine and look for a recipe specifically for sourdough bread or consult online resources for guidance on how to make sourdough bread in a bread machine. It is also important to note that not all bread machines are created equal, some models may be better suited for sourdough bread than others.
What is the difference between sourdough bread and regular bread?
The main difference between sourdough bread and regular bread is the way in which they are leavened, or made to rise. Regular bread is made with commercial yeast, which is a specific strain of the Saccharomyces cerevisiae fungus that has been isolated and propagated for use in baking. This yeast is added to the dough in a dry or liquid form, and it ferments the sugars in the dough, creating carbon dioxide, which causes the dough to rise. The fermentation process is relatively quick, typically taking a few hours.
Sourdough bread, on the other hand, is made with a sourdough starter, which is a mixture of flour and water that has been fermented with wild yeast and lactic acid bacteria. The wild yeast and bacteria naturally present in the flour and environment are used to ferment the dough. The fermentation process takes longer, typically taking several hours or even days. This extended fermentation period allows the dough to develop a tangy, complex flavor and a more open crumb structure.
Additionally, Sourdough bread is considered as a healthier option, as the fermentation process breaks down gluten and other complex carbohydrates, making it easier to digest. It also has a lower glycemic index and increased nutrient availability, compared to regular bread made with commercial yeast.
It is important to note that not all sourdough bread is made using traditional methods, some bakers may use a combination of commercial yeast and sourdough starter, which can lead to a less tangy and complex flavor compared to traditional sourdough bread.
How do I know when my sourdough starter is ready to use?
A sourdough starter is considered ready to use when it has reached its peak activity and is able to leaven bread dough. Here are some signs that indicate a starter is ready to use:
- The starter has doubled or tripled in volume: This is a good indication that the wild yeast and bacteria present in the starter are active and fermenting the sugars in the flour.
- The starter is bubbly and has a strong, sour aroma: As the wild yeast and bacteria ferment the sugars in the flour, they produce carbon dioxide, which causes the starter to become bubbly and gives it a sour aroma.
- A “hooch” (alcoholic liquid) has formed on the surface: When the starter is overactive, it can produce an alcoholic liquid called “hooch” on the surface. This is a sign that the starter is ready to use.
- A “float test”: you can drop a spoonful of starter in a glass of water, if it floats, it’s ready to use.
It is important to note that the timing of when a starter is ready to use can vary depending on the type of flour used, the temperature, and the humidity of the environment. It can take anywhere from a few days to a week for a starter to reach peak activity.
Once the starter is ready, it can be used to make bread or can be refreshed (fed with flour and water) and stored in the refrigerator to be used at a later time.
How do I maintain my sourdough starter?
Maintaining a sourdough starter is relatively simple, but it does require regular attention. Here are some general guidelines for maintaining a sourdough starter:
- Feeding: A sourdough starter needs to be regularly fed with flour and water to keep it active. The ratio of flour to water can vary, but a common ratio is 1:1 (by weight). The frequency of feeding will depend on how often the starter is used, but it’s generally recommended to feed it at least once a week if not in use.
- Temperature: Sourdough starter thrives at a warm room temperature between 70-80°F (21-27°C) and will ferment more quickly at higher temperatures. Cold temperatures can slow or even halt the fermentation process.
- Discarding: Sourdough starter will continue to ferment and grow, and it’s necessary to discard a portion of the starter before feeding it. Discarding some of the starter will help to maintain the desired consistency and prevent the starter from becoming too dense.
- Storing: Sourdough starter can be stored in the refrigerator when not in use. It can be stored for several weeks, but it will need to be taken out and fed before using it. When storing it, make sure that the starter is covered with a tight-fitting lid or plastic wrap to prevent it from drying out.
- Cleanliness: Keep your equipment and work area clean, to prevent unwanted bacteria or mold from contaminating the starter.
It’s essential to note that, even with regular maintenance, sourdough starter can go through phases of being more or less active, and this can vary depending on the time of year and environmental factors like temperature and humidity. With time and practice, you will learn to recognize the signs of a healthy starter, and will be able to adjust the feeding schedule and temperature accordingly.
How long can I store sourdough bread?
Sourdough bread has a longer shelf life than bread made with commercial yeast due to the natural fermentation process that occurs during the rising period. Properly stored, sourdough bread can last for up to a week or more at room temperature.
Here are some tips for storing sourdough bread:
- Room temperature: Sourdough bread can be stored at room temperature in a bread box or a paper bag. Be sure to keep it out of direct sunlight and away from heat sources.
- Refrigeration: Sourdough bread can also be stored in the refrigerator, but it should be wrapped tightly in plastic wrap or placed in a resealable plastic bag to prevent it from drying out.
- Freezing: Sourdough bread can be frozen for longer storage. To freeze, wrap the bread in plastic wrap or aluminum foil, and place it in a resealable plastic bag.
It’s important to note that freezing can change the texture of the bread, and it’s best to consume it within 3-4 months of freezing it.
When storing sourdough bread, it’s important to keep in mind that the longer it’s stored, the more the flavor and texture will change, so it’s recommended to consume it within a week for the best taste and texture.
How can I fix a sourdough bread that didn’t rise?
There are several reasons why a sourdough bread may not rise, and several ways to fix it. Here are a few common causes and solutions for a sourdough bread that hasn’t risen:
- Insufficient fermentation: Sourdough bread relies on the natural fermentation of the starter to rise. If the dough hasn’t been given enough time to ferment, it may not have risen as much as it should have. To fix this, give the dough more time to ferment by letting it rise for longer before baking.
- Incorrect temperature: Sourdough bread ferments best at warm temperatures between 70-80°F (21-27°C). If the dough was too cold, it may not have risen as much as it should have. To fix this, make sure the dough is kept at a warm room temperature during fermentation.
- Weak starter: If the starter is weak or has not been fed enough, it may not have enough strength to rise the dough. To fix this, feed the starter more frequently or with more flour and water to build up its strength.
- Incorrect flour: Sourdough bread made with high-gluten flour will rise more than bread made with low-gluten flour, so make sure you’re using the right type of flour for your recipe.
- Overproofing: If the dough has been left to rise for too long, it can become overproofed and will not rise any further. To fix this, reshape the dough and let it rise again for a shorter period of time.
- Improper shaping: If the dough has not been shaped properly, it may not have risen as much as it should have. To fix this, reshape the dough and make sure it’s been shaped correctly before baking.
Sourdough Rise Times
| Stage | Description | Estimated Time |
|---|---|---|
| Initial Fermentation | The dough is mixed and left to ferment in a warm place | 4-12 hours |
| Shaping | The dough is shaped into a loaf and left to rise | 1-2 hours |
| Final Rise | The shaped loaf is left to rise before baking | 1-2 hours |
| Proofing | The shaped loaf is left to rest before baking | 30 minutes – 1 hour |
| Baking | The loaf is placed in the oven and baked | 30 minutes – 1 hour |
How do I shape sourdough bread dough?
Shaping sourdough bread dough is an important step in the bread-making process as it helps to create the desired shape and structure of the bread. Here are the basic steps for shaping sourdough bread dough:
- Start by dusting your work surface with flour to prevent the dough from sticking.
- Gently remove the dough from the proofing bowl and place it on the floured surface.
- Gently shape the dough into a round or oval shape by tucking the edges under.
- To shape the dough into a boule (round loaf), cup your hands around the dough and rotate it in a circular motion on the floured surface. This helps to create tension on the surface of the dough and forms a smooth, taut surface.
- To shape the dough into a batard (oblong loaf), use your fingers to gently press down on the dough and shape it into an elongated shape.
- Once you have shaped the dough, place it into a floured proofing basket or a bowl lined with a floured towel.
- Cover the dough with a towel and let it rise again for the final rise before baking.
- Flouring the surface, dough and proofing basket/bowl is important to prevent the dough from sticking and to help the dough rise and hold its shape.
It’s important to note that shaping the dough correctly will help the bread rise properly and give it a good structure, so it’s best to practice shaping the dough to get a feel for it.
How do I know when sourdough bread is done baking?
Knowing when sourdough bread is done baking can be challenging, but there are a few ways to tell when the bread is fully cooked:
- Tap the bottom of the bread: A fully baked loaf of bread will sound hollow when tapped on the bottom.
- Internal temperature: The internal temperature of the bread should reach at least 190-210°F (88-99°C). Use a digital thermometer to check the internal temperature of the bread.
- Look at the crust: The crust should be a deep golden brown color and should be firm to the touch.
- Check the loaf volume: A fully baked loaf will have a larger volume than an under-baked loaf.
- Smell: A fully baked loaf should have a warm, bread-like aroma.
It’s important to note that these are general guidelines and that different types of bread may have slightly different characteristics when they are done baking. It’s always best to check with multiple methods to ensure your bread is fully baked, and not under or over baked. It’s also important to note that Sourdough bread, because it uses natural yeast, may have a more moist crumb and a different texture than bread made with commercial yeast.
Can I freeze sourdough bread?
Yes, you can freeze sourdough bread. Freezing is a great way to extend the shelf life of sourdough bread and enjoy it at a later time. Here are a few tips for freezing sourdough bread:
- Allow the bread to cool completely: Before freezing the bread, make sure it has cooled completely to room temperature. This will prevent any condensation from forming inside the bread when it is frozen.
- Slice the bread: Slice the bread into the desired thickness before freezing. This will make it easier to thaw and reheat individual slices as needed.
- Use freezer-safe bags: Place the sliced bread in a freezer-safe bag or wrap it tightly in plastic wrap or aluminum foil. Squeeze as much air out of the bag as possible to prevent freezer burn.
- Label and date the bread: Label the bag with the date the bread was frozen and the type of bread it is.
- Thawing the bread: To thaw the bread, remove it from the freezer and place it in a preheated 350 degree F oven for 8-10 minutes or on a countertop for 2 hours. You can also place the frozen slice in a toaster or microwave to quickly thaw it.
It’s important to note that freezing can affect the texture of the bread and it might not be as fresh as when it was first baked. However, it’s a great way to extend the life of your bread and enjoy it at a later time.
What is a sourdough discard?
A sourdough discard refers to the portion of the sourdough starter that is removed before feeding. Sourdough starter is typically made by mixing flour and water together and allowing wild yeasts and lactic acid bacteria present in the flour and air to ferment and create a leavening culture. This culture is then used to make sourdough bread.
However, in order to maintain the starter, it must be “fed” with fresh flour and water on a regular basis. When the starter is fed, a portion of it is removed, which is referred to as the discard. This portion of the starter can be used in other recipes such as pancakes, waffles, crackers, or even cookies. Using the discard helps to reduce waste, and it can add a delicious tangy flavor to other baked goods. Some bakers also share or gift their discard to other bakers, to help them start their own sourdough culture.
Can I use sourdough starter for other recipes?
Yes, you can use sourdough starter in other recipes beyond just sourdough bread. Sourdough starter is a fermented mixture of flour and water that contains wild yeasts and lactic acid bacteria. The natural fermentation process gives the starter a tangy, sour flavor and makes it a versatile ingredient for many different types of recipes. Here are a few examples of recipes that use sourdough starter:
- Pancakes and waffles: Sourdough starter can be used in place of commercial yeast or baking powder to make pancakes and waffles. The starter will give them a slightly tangy flavor and a light, fluffy texture.
- Crackers: Sourdough starter can be mixed with flour, salt, and oil to make crackers. The starter will give the crackers a tangy flavor and a crispy texture.
- Cookies: Sourdough starter can be added to cookie dough to give them a unique flavor and a chewy texture.
- Pizza dough: Sourdough starter can be used to make pizza dough, giving it a unique flavor and a crispy crust.
- Sourdough cakes: Sourdough starter can also be used in cakes, muffins, and other sweet goods, adding a tangy taste to them.
- Biscuits: Sourdough starter can be added to biscuits, providing a unique flavor and a light and fluffy texture.
How do I troubleshoot common sourdough bread problems?
- Sourdough bread not rising: This can be caused by a weak starter, not enough fermentation time, or using flour that is too low in protein. To fix this, make sure your starter is healthy and active, give the dough enough time to rise, and use flour that is high in protein.
- Sourdough bread with a dense texture: This can be caused by using too much flour, not enough fermentation time, or not shaping the dough properly. To fix this, make sure to use the correct amount of flour, give the dough enough time to rise, and properly shape the dough before baking.
- Sourdough bread with a heavy, thick crust: This can be caused by baking the bread at too high of a temperature, not enough humidity in the oven, or not scoring the bread before baking. To fix this, lower the baking temperature, use a Dutch oven or a baking stone to create more humidity in the oven, and score the bread to release steam.
- Sourdough bread with a gummy texture: This can be caused by over-kneading the dough, not allowing the dough to rise enough, or not shaping the dough properly. To fix this, handle the dough gently, give the dough enough time to rise, and properly shape the dough before baking.
- Sourdough bread with a uneven shape: This can be caused by not shaping the dough properly, not allowing the dough to rise enough, or not using a proper baking vessel. To fix this, shape the dough properly, give the dough enough time to rise, and use a baking vessel that is the correct size for the dough.
- Sourdough bread with a uneven color: This can be caused by uneven temperature in the oven, using a baking sheet that is too dark, or not rotating the bread during baking. To fix this, use an oven thermometer, use a baking sheet that is light-colored, and rotate the bread during baking.
How do I get a crispy crust on sourdough bread?
There are several ways to get a crispy crust on sourdough bread:
- Preheat a baking stone or Dutch oven: Preheating a baking stone or Dutch oven in the oven can create more humidity, which helps the bread to form a crispy crust.
- Use a spray bottle: Before placing the dough in the oven, spray it with water. The water will evaporate and create steam, which helps the crust to become crispy.
- Score the bread: Scoring the bread before baking allows steam to escape, which helps the crust to become crispy.
- Place ice cubes in the oven: Placing ice cubes in the oven can also create steam and help the crust to become crispy.
- Keep the oven door closed: Keeping the oven door closed during the first 10-15 minutes of baking helps to trap steam inside, which helps the crust to become crispy.
- Bake at a high temperature: Baking at a high temperature can also help to create a crispy crust.
How do I get a fluffy interior in sourdough bread?
Here’s how to achieve a fluffy interior in sourdough bread:
- Use a higher hydration dough: A higher hydration dough, one with more water in proportion to flour, will produce a lighter, fluffier loaf.
- Use a longer fermentation time: Allowing the dough to ferment for a longer period of time will help to develop more flavor and a fluffier texture.
- Use a pre-ferment: Adding a small amount of pre-fermented dough to the final dough can also help to create a fluffier texture.
- Use a banneton or proofing basket: Using a banneton or proofing basket can help to create a more evenly shaped loaf, which can contribute to a fluffier texture.
- Use a Dutch oven or covered pot: Baking the bread in a covered pot or Dutch oven can help to trap steam, which can help to create a fluffier texture.
- Avoid over-kneading the dough: Over-kneading can cause the gluten to break down, resulting in a dense loaf. Knead the dough until it is just combined and smooth.
It’s important to note that, the exact method to achieve a fluffy interior may vary depending on the recipe and personal preference. Experimenting with different methods and adjusting the recipe can help you find the one that works best for you.
Can I make sourdough bread with whole wheat flour?
Yes, you can make sourdough bread with whole wheat flour. Whole wheat flour is a type of flour that is made by grinding the entire wheat kernel, including the bran, germ, and endosperm. Whole wheat flour contains more nutrients than white flour, but it can also make the dough denser and harder to rise.
When making sourdough bread with whole wheat flour, it’s important to use a starter that is active and healthy. A well-established starter will have more wild yeast and bacteria to help the dough to rise. It’s also important to use a higher hydration dough, as whole wheat flour absorbs more water than white flour.
You may also want to mix whole wheat flour with other types of flour, such as bread flour, to lighten the dough and make it easier to rise. Many bakers use a combination of white flour and whole wheat flour, known as “white whole wheat flour” which is lighter in color than regular whole wheat flour and gives a lighter texture to bread.
It is recommended to experiment with different ratios of whole wheat flour to white flour and adjust the fermentation time and temperature accordingly to achieve the desired texture and flavor.
Sourdough Recipe Variations
| Sourdough Recipe Variations | Tips for achieving desired results |
|---|---|
| Classic Sourdough | Use a combination of all-purpose and bread flour. Allow for a longer fermentation and proofing time. |
| Whole Wheat Sourdough | Use a higher ratio of whole wheat flour to all-purpose flour. Allow for a longer fermentation and proofing time. |
| Gluten-Free Sourdough | Use a blend of gluten-free flours such as rice flour, almond flour, and tapioca flour. Allow for a shorter fermentation and proofing time. |
Can I make sourdough bread with gluten-free flour?
It is possible to make sourdough bread with gluten-free flour, but it can be more challenging than making sourdough bread with wheat flour. Gluten is a protein that helps to give bread its structure, and gluten-free flours lack this protein, so it’s harder to achieve a similar structure.There are a variety of gluten-free flours available, such as rice flour, corn flour, and almond flour, but they often require additional ingredients such as xanthan gum, guar gum, or psyllium husk powder to help the dough hold its shape.
It’s important to note that traditional sourdough starter is made with wheat flour, which contains gluten. If you have gluten intolerance or celiac disease, you will need to use a gluten-free starter. You can make a gluten-free sourdough starter with gluten-free flour, like rice flour or buckwheat flour.
It is recommended to use a recipe specifically designed for gluten-free sourdough bread, as the fermentation time, rising time, and temperature may differ from traditional sourdough bread recipes. Additionally, some experimentation may be needed to achieve the desired texture and flavor.
How do I make sourdough bread with a higher rise?
There are several ways to make sourdough bread with a higher rise:
- Use a healthy, active starter: A well-established starter that is fed regularly will have more wild yeast and bacteria, which will help the dough to rise.
- Use a higher hydration dough: A higher hydration dough (one that contains more water) will be more extensible and will rise more easily.
- Allow for a longer fermentation period: Sourdough bread requires a longer fermentation period than bread made with commercial yeast. By allowing the dough to ferment for longer, the wild yeast and bacteria will have more time to multiply and produce more gas, which will help the bread rise.
- Create a warm environment for the dough to rise: Yeast and bacteria thrive in warm environments. By keeping the dough in a warm place (around 78-80°F) during the fermentation and rising period, the dough will rise more quickly and efficiently.
- Use a Dutch oven: When baking bread in a Dutch oven, the bread rises more than when it is baked on a baking sheet. The lid of the Dutch oven traps the steam, which helps to create a humid environment and allows the bread to rise more.
- Create a scoring pattern: Scoring the bread (making cuts on the surface) allows the bread to expand and rise more during the baking process.
- Be patient: Sourdough bread takes time to rise, and it is important to be patient and not rush the process.
By following these tips, you can achieve a higher rise on your sourdough bread. Keep in mind that sourdough bread will not rise as much as bread made with commercial yeast, but with practice and patience, you can still achieve a good rise.
How do I make sourdough bread with a stronger sour flavor?
Here’s how to make sourdough bread with a stronger sour flavor:
- Use a well-established starter: A well-established starter that has been fed regularly will have a higher concentration of wild yeast and bacteria, which will create a more sour flavor in the bread.
- Allow for a longer fermentation period: Sourdough bread requires a longer fermentation period than bread made with commercial yeast. By allowing the dough to ferment for longer, the wild yeast and bacteria will have more time to multiply and produce more lactic acid, which will create a more sour flavor.
- Use a lower hydration dough: A lower hydration dough (one that contains less water) will have a stronger flavor due to the higher concentration of flour.
- Use a higher ratio of starter to flour: Using a higher ratio of starter to flour will increase the amount of wild yeast and bacteria in the dough, which will create a more sour flavor.
- Use whole wheat flour: Whole wheat flour contains more wild yeast and bacteria than white flour, which will create a more sour flavor.
- Use a sourdough discard: Sourdough discard is the portion of the starter that is removed before feeding it. It contains more wild yeast and bacteria than the fed starter, which will create a more sour flavor.
- Experiment with different types of flour: Different types of flour will create different flavors in sourdough bread. Experiment with different types of flour to find the flavor that you prefer.
- Be patient: Sourdough bread takes time to develop its flavor, and it is important to be patient and not rush the process.
How do I make sourdough bread with a softer crust?
There are different ways to make sourdough bread with a softer crust:
- Use a pan with a lid: Covering the bread while it bakes will trap the steam inside the pan, which will soften the crust.
- Brush the bread with butter or oil: Brushing the bread with butter or oil before baking will create a barrier on the surface of the bread that will prevent the crust from hardening.
- Add sugar or honey to the dough: Sugar or honey will caramelize during baking, creating a softer crust.
- Use a baking stone: Baking on a baking stone will create a more humid environment which will soften the crust.
- Use a Dutch oven: Baking sourdough bread in a Dutch oven will trap the steam inside and soften the crust.
- Spray water on the bread: Spritzing water on the bread during the first few minutes of baking will create steam and soften the crust.
- Increase the water content of the dough: A higher hydration dough (more water) will create a softer crust.
- Use a flour paste: Before baking, brushing a flour paste (made from flour and water) on the surface of the bread will create a barrier that will prevent the crust from hardening.
How do I make sourdough bread with a chewier texture?
There are several ways to make sourdough bread with a chewier texture:
- Use a high-gluten flour: High-gluten flour, such as bread flour, has a higher protein content which will create a chewier texture in the bread.
- Increase the fermentation time: Allowing the dough to ferment for longer periods of time will develop more gluten, resulting in a chewier texture.
- Stretch and fold the dough: Stretching and folding the dough before shaping it will develop the gluten, resulting in a chewier texture.
- Use a cold fermentation method: Cold fermentation will slow down the fermentation process, which will result in a chewier texture due to the increased acidity in the dough.
- Use a pre-ferment: Adding a small amount of pre-ferment (such as a poolish, biga or levain) to the dough can contribute to chewier texture.
- Add vital wheat gluten: Adding a small amount of vital wheat gluten to the dough can increase the gluten content and result in a chewier texture.
- Use a lower hydration dough: Dough with a lower hydration (less water) will be denser and chewier, but also harder to shape and handle.
How do I make sourdough bread with a more open crumb?
Here are the different ways to make sourdough bread with a more open crumb:
- Use a high-hydration dough: Dough with a high hydration (more water) will be less dense, resulting in a more open crumb.
- Use a preferment: Adding a small amount of pre-ferment (such as a poolish, biga or levain) to the dough can contribute to a more open crumb.
- Use a long fermentation: Allowing the dough to ferment for longer periods of time will develop more gluten and create a more open crumb.
- Use a higher percentage of levain: Using a higher percentage of levain in the dough can create a more open crumb due to the acidity and enzymes produced by the wild yeast.
- Stretch and fold the dough: Stretching and folding the dough before shaping it will develop the gluten and create a more open crumb.
- Use a baking method that creates steam: Creating steam in the oven (such as by putting a tray of water at the bottom of the oven) will help the dough to rise and create a more open crumb.
- Use a sharp blade or razor to make slashes on the top of the dough before baking this will create an opening for the dough to rise and to have a more open crumb.
How do I make sourdough bread with a tangier flavor?
There are a number of ways to make sourdough bread with a tangier flavor:
- Use a mature starter: The longer a starter is used, the more acidic it will become, which will result in a tangier flavor in the bread.
- Use a higher percentage of starter: Using more starter in the dough will increase the acidity and create a tangier flavor.
- Use a longer fermentation: Allowing the dough to ferment for longer periods of time will develop more acidity, resulting in a tangier flavor.
- Use a lower hydration dough: Lower hydration dough will have a stronger flavor due to the concentration of ingredients.
- Use a cold fermentation: fermenting the dough in the refrigerator will help to slow down the fermentation process and create a more tangy flavor.
- Use a high-acid ingredient: Adding an ingredient high in acidity such as vinegar or citrus juice can help to create a tangier flavor.
How do I make sourdough bread with a more moist crumb?
There are several ways to make sourdough bread with a more moist crumb:
- Use a higher hydration dough: Increasing the amount of water in the dough will make the bread more moist.
- Add more fat: Adding ingredients such as butter or oil to the dough will add moisture to the bread.
- Use a longer fermentation: Allowing the dough to ferment for longer periods of time will allow for a more complete fermentation which will results in a more moist bread.
- Steam the bread: Adding steam to the oven during baking will help to create a moister environment for the bread to bake in, resulting in a moister crumb.
- Use a pre-ferment: Adding a pre-ferment to the dough can help to retain moisture in the bread.
- Cover the bread with foil during the last 15 minutes of baking: This will help to trap the moisture inside the bread, resulting in a moister crumb.
How do I make sourdough bread with a more airy texture?
Here’s how to make sourdough bread with a more airy texture:
- Use a higher hydration dough: A higher hydration dough will create more air pockets in the bread.
- Use a longer fermentation: Allowing the dough to ferment for longer periods of time will create more bubbles in the dough, resulting in a more airy bread.
- Use a preferment: Adding a preferment, such as a poolish or biga, can add more air to the dough and create a more airy bread.
- Use a longer rise: Allowing the bread to rise for longer periods of time will help to create a more airy texture.
- Use a stronger starter: A stronger starter will create more CO2, which in turn creates more air pockets in the bread.
- Use a stronger mixing method: Using a stronger mixing method such as a stand mixer, will help to develop the gluten and create more air pockets in the bread.
- Slash the bread before baking: Make deep cuts on the surface of the loaf before baking. This will help the bread to expand and create a more airy texture.
Adding Different Sourdough Ingredients
| Ingredient | Amount | Incorporation Instructions |
|---|---|---|
| Nuts (such as almonds or walnuts) | 1/2 cup | Roughly chop and add during the final stages of dough mixing. |
| Seeds (such as pumpkin or sunflower) | 1/4 cup | Mix into the flour before adding to the dough. |
| Dried fruit (such as raisins or cranberries) | 1/2 cup | Soak in warm water for 10 minutes and add during the final stages of dough mixing. |
How to make sourdough in a bread machine
| Step | Description |
|---|---|
| 1 | Prepare the sourdough starter by mixing flour and water together and allowing it to sit at room temperature until it becomes active and bubbly. |
| 2 | Mix together the flour, water, and sourdough starter in the bread machine, according to the manufacturer’s instructions. |
| 3 | Select the “dough” setting on the bread machine and start the cycle. |
| 4 | Once the dough has finished rising, remove it from the bread machine and shape it into a loaf. |
| 5 | Place the shaped loaf into a greased loaf pan and let it rise again. |
| 6 | Bake the loaf according to the manufacturer’s instructions for your bread machine. |
| 7 | Once done, allow the bread to cool before slicing and serving. |
How to make sourdough in a dutch oven
| Step | Description |
|---|---|
| 1 | Mix together flour, water, and sourdough starter in a large bowl until a shaggy dough forms. |
| 2 | Cover the bowl with a towel and let the dough rest for 12-24 hours. |
| 3 | Preheat your dutch oven in a preheated oven at 450°F for 30 minutes. |
| 4 | Turn the dough out onto a floured surface and shape into a round loaf. |
| 5 | Place the loaf on a piece of parchment paper and slash the top with a sharp knife. |
| 6 | Carefully remove the preheated dutch oven from the oven, take off the lid, and place the loaf, parchment paper and all, into the pot. |
| 7 | Cover the dutch oven and return it to the oven. Bake for 30 minutes. |
| 8 | Remove the lid and continue to bake for an additional 20-30 minutes, or until the bread is golden brown and sounds hollow when tapped on the bottom. |
| 9 | Carefully remove the bread from the dutch oven and transfer to a wire rack to cool completely. |